Run your first job
In this tutorial, we will use the DeePMD-kit software as an example to introduce how to run a job on the Bohrium platform.
1. Registration
Click here to go to the Bohrium homepage. In the top right corner of the page, click the "Log in/Register" button to register a Bohrium account using your mobile number. If you already have an account for other DP products, you can skip this step and log in directly.

2. Top-up and create a project
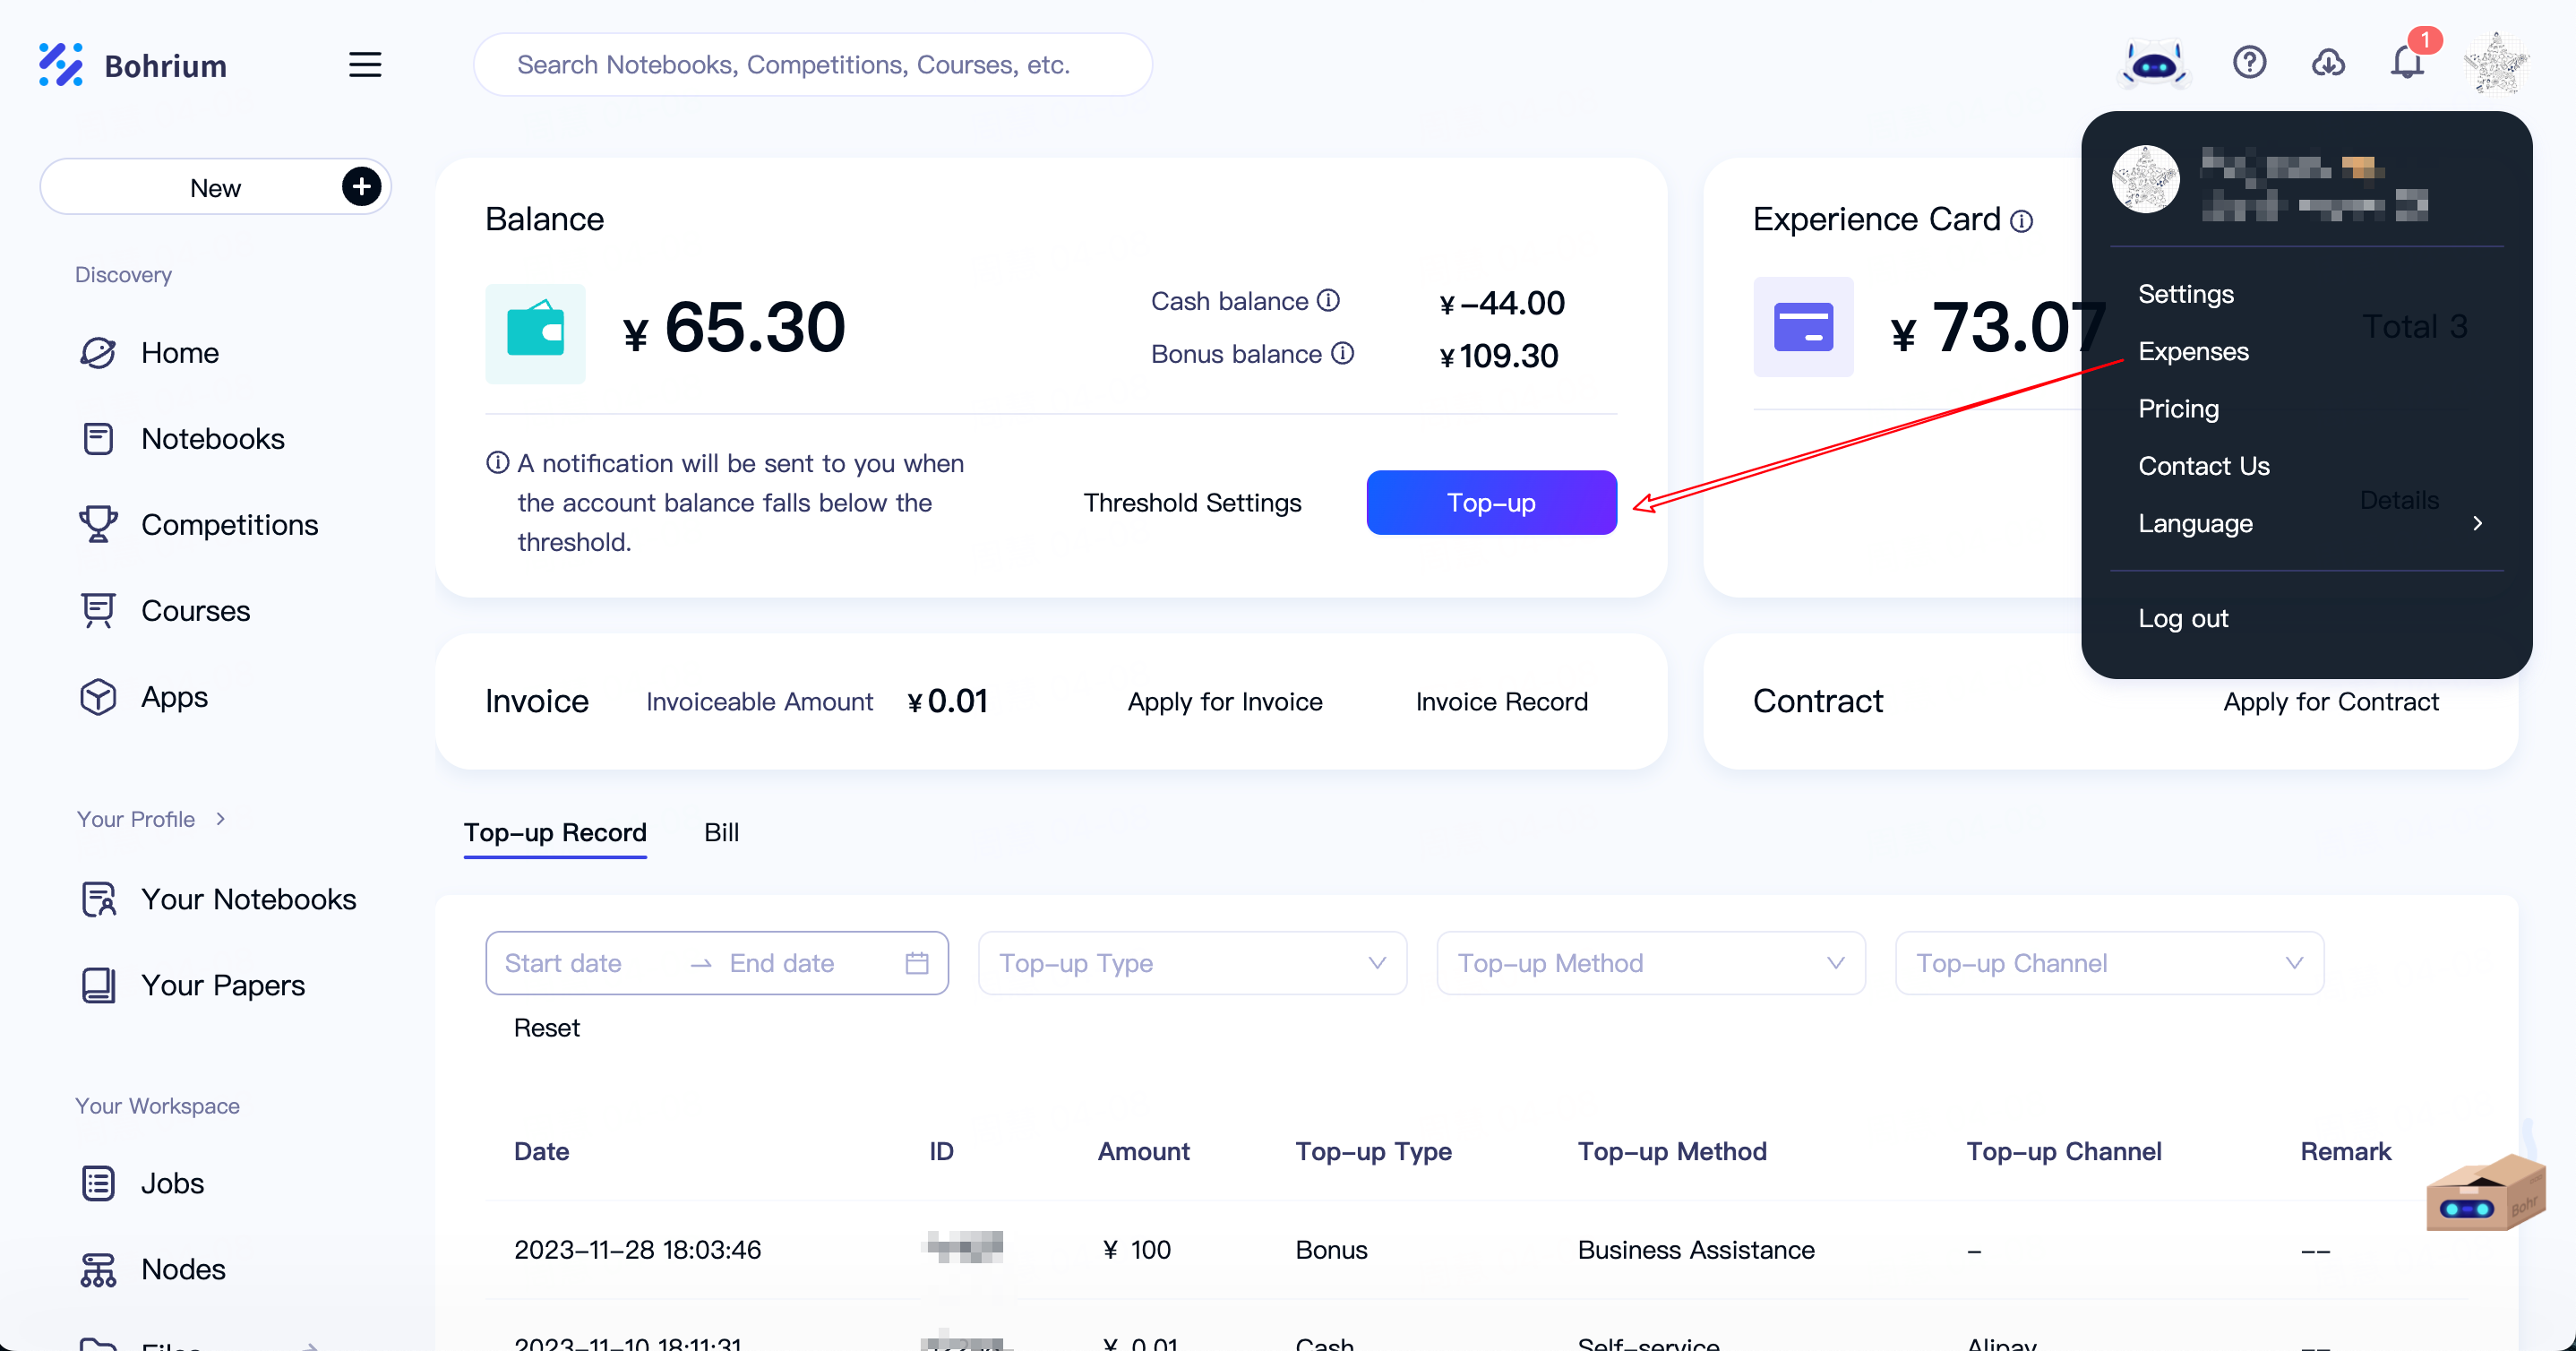
Bohrium supports online top-up. You can click on the "User Center" on the top right avatar to recharge by yourself.
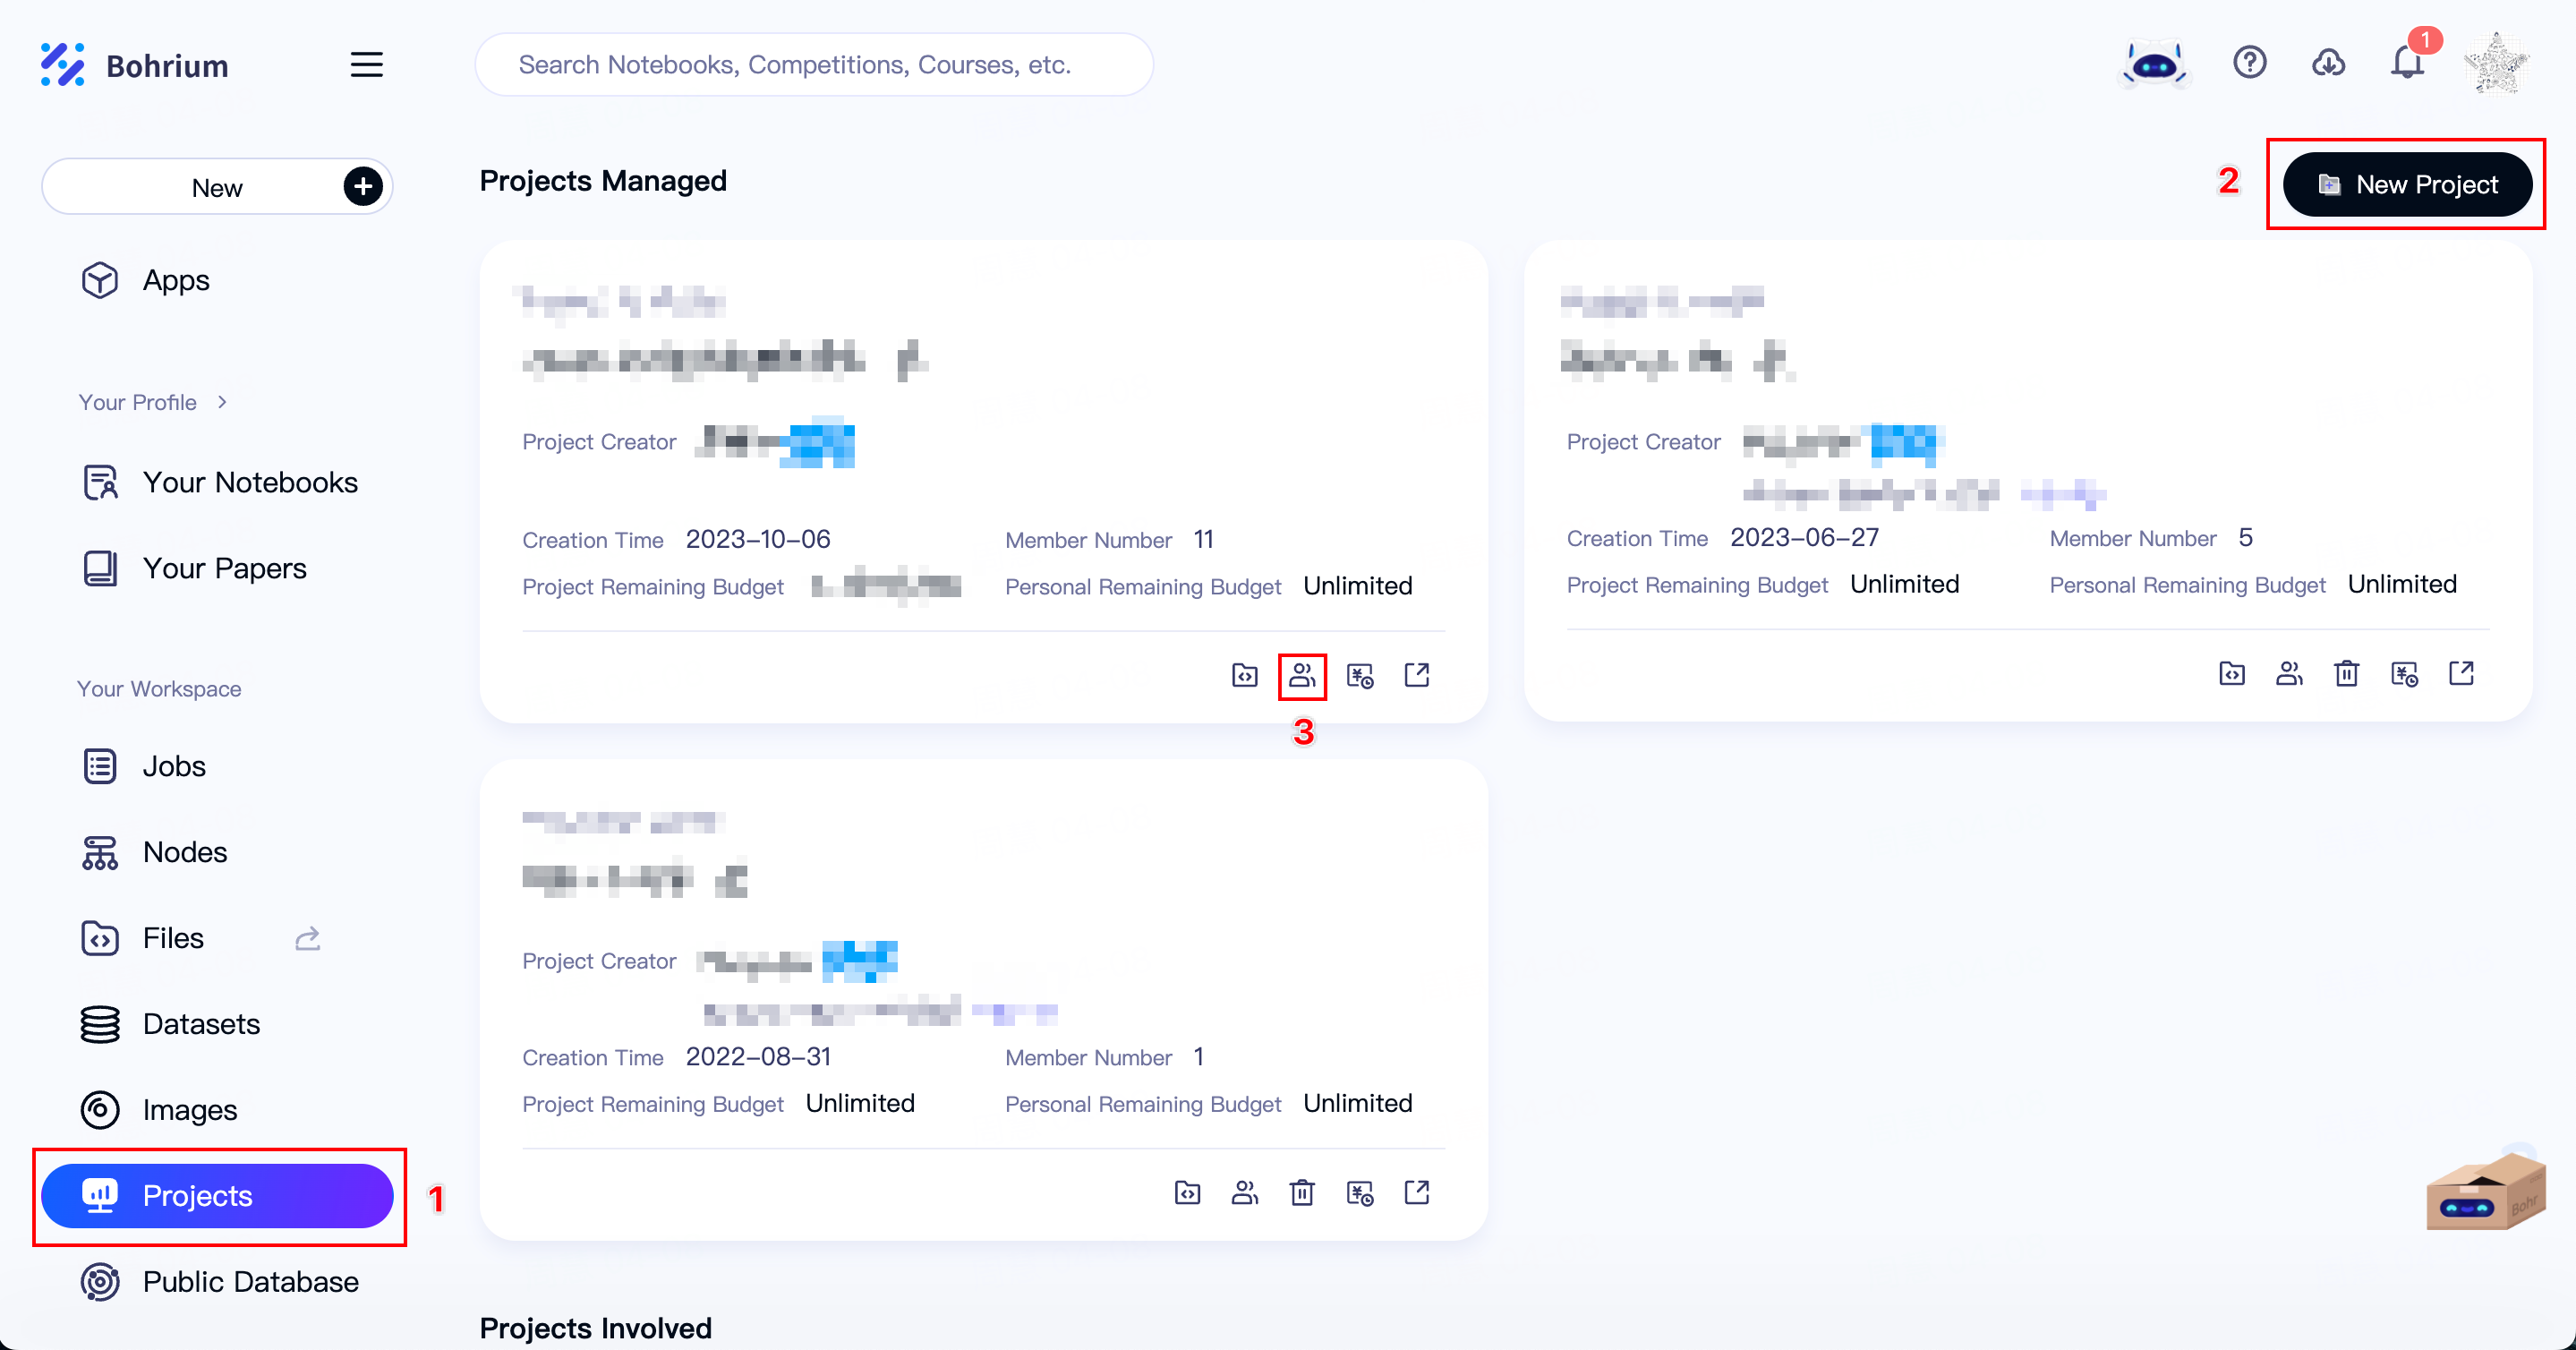
After completing the top-up, click on the navigation bar - "Projects" (red box 1 in the image), and then click "New Project" in the upper right corner of the page (red box 2 in the image).
Give the project a name that is easy for you to recognize and click "OK". If the project has other collaborators, you can click on "Members" (red box 3 in the image) to add project members.
The creator of the project can allocate budgets, add or remove members, view the bills of each member, etc. Project members can directly spend the creator's balance when submitting jobs, and members can also share images to each other. For more information on project collaboration, please refer to Project Collaboration.
If your funds come from other people's accounts, such as your tutor or a company, you can ask the provider of the funds to create a project and add you as a project member.
3. Create the management node (optional)
The management node is used for data preparation, compilation debugging, result processing, and other scenarios.
Bohrium provides a visual file management capability in the management node, with online previews of structure files, trajectories, scripts, and images.
In this tutorial, the management node is used for preparing DeePMD-kit input files and job submission. You can also choose to perform related operations on your local machine or other machines.
On the Nodes page, click "Create Container" in the upper right corner. In this tutorial, choose the image
ubuntu:20.04-py3.10, and select the corresponding project for the "Project" field. There is no need to modify the machine, disk, and automatic stop options, keep the default values.It usually takes about 10 second to start. When the node status changes from "Preparing" to "Running", you can connect it.
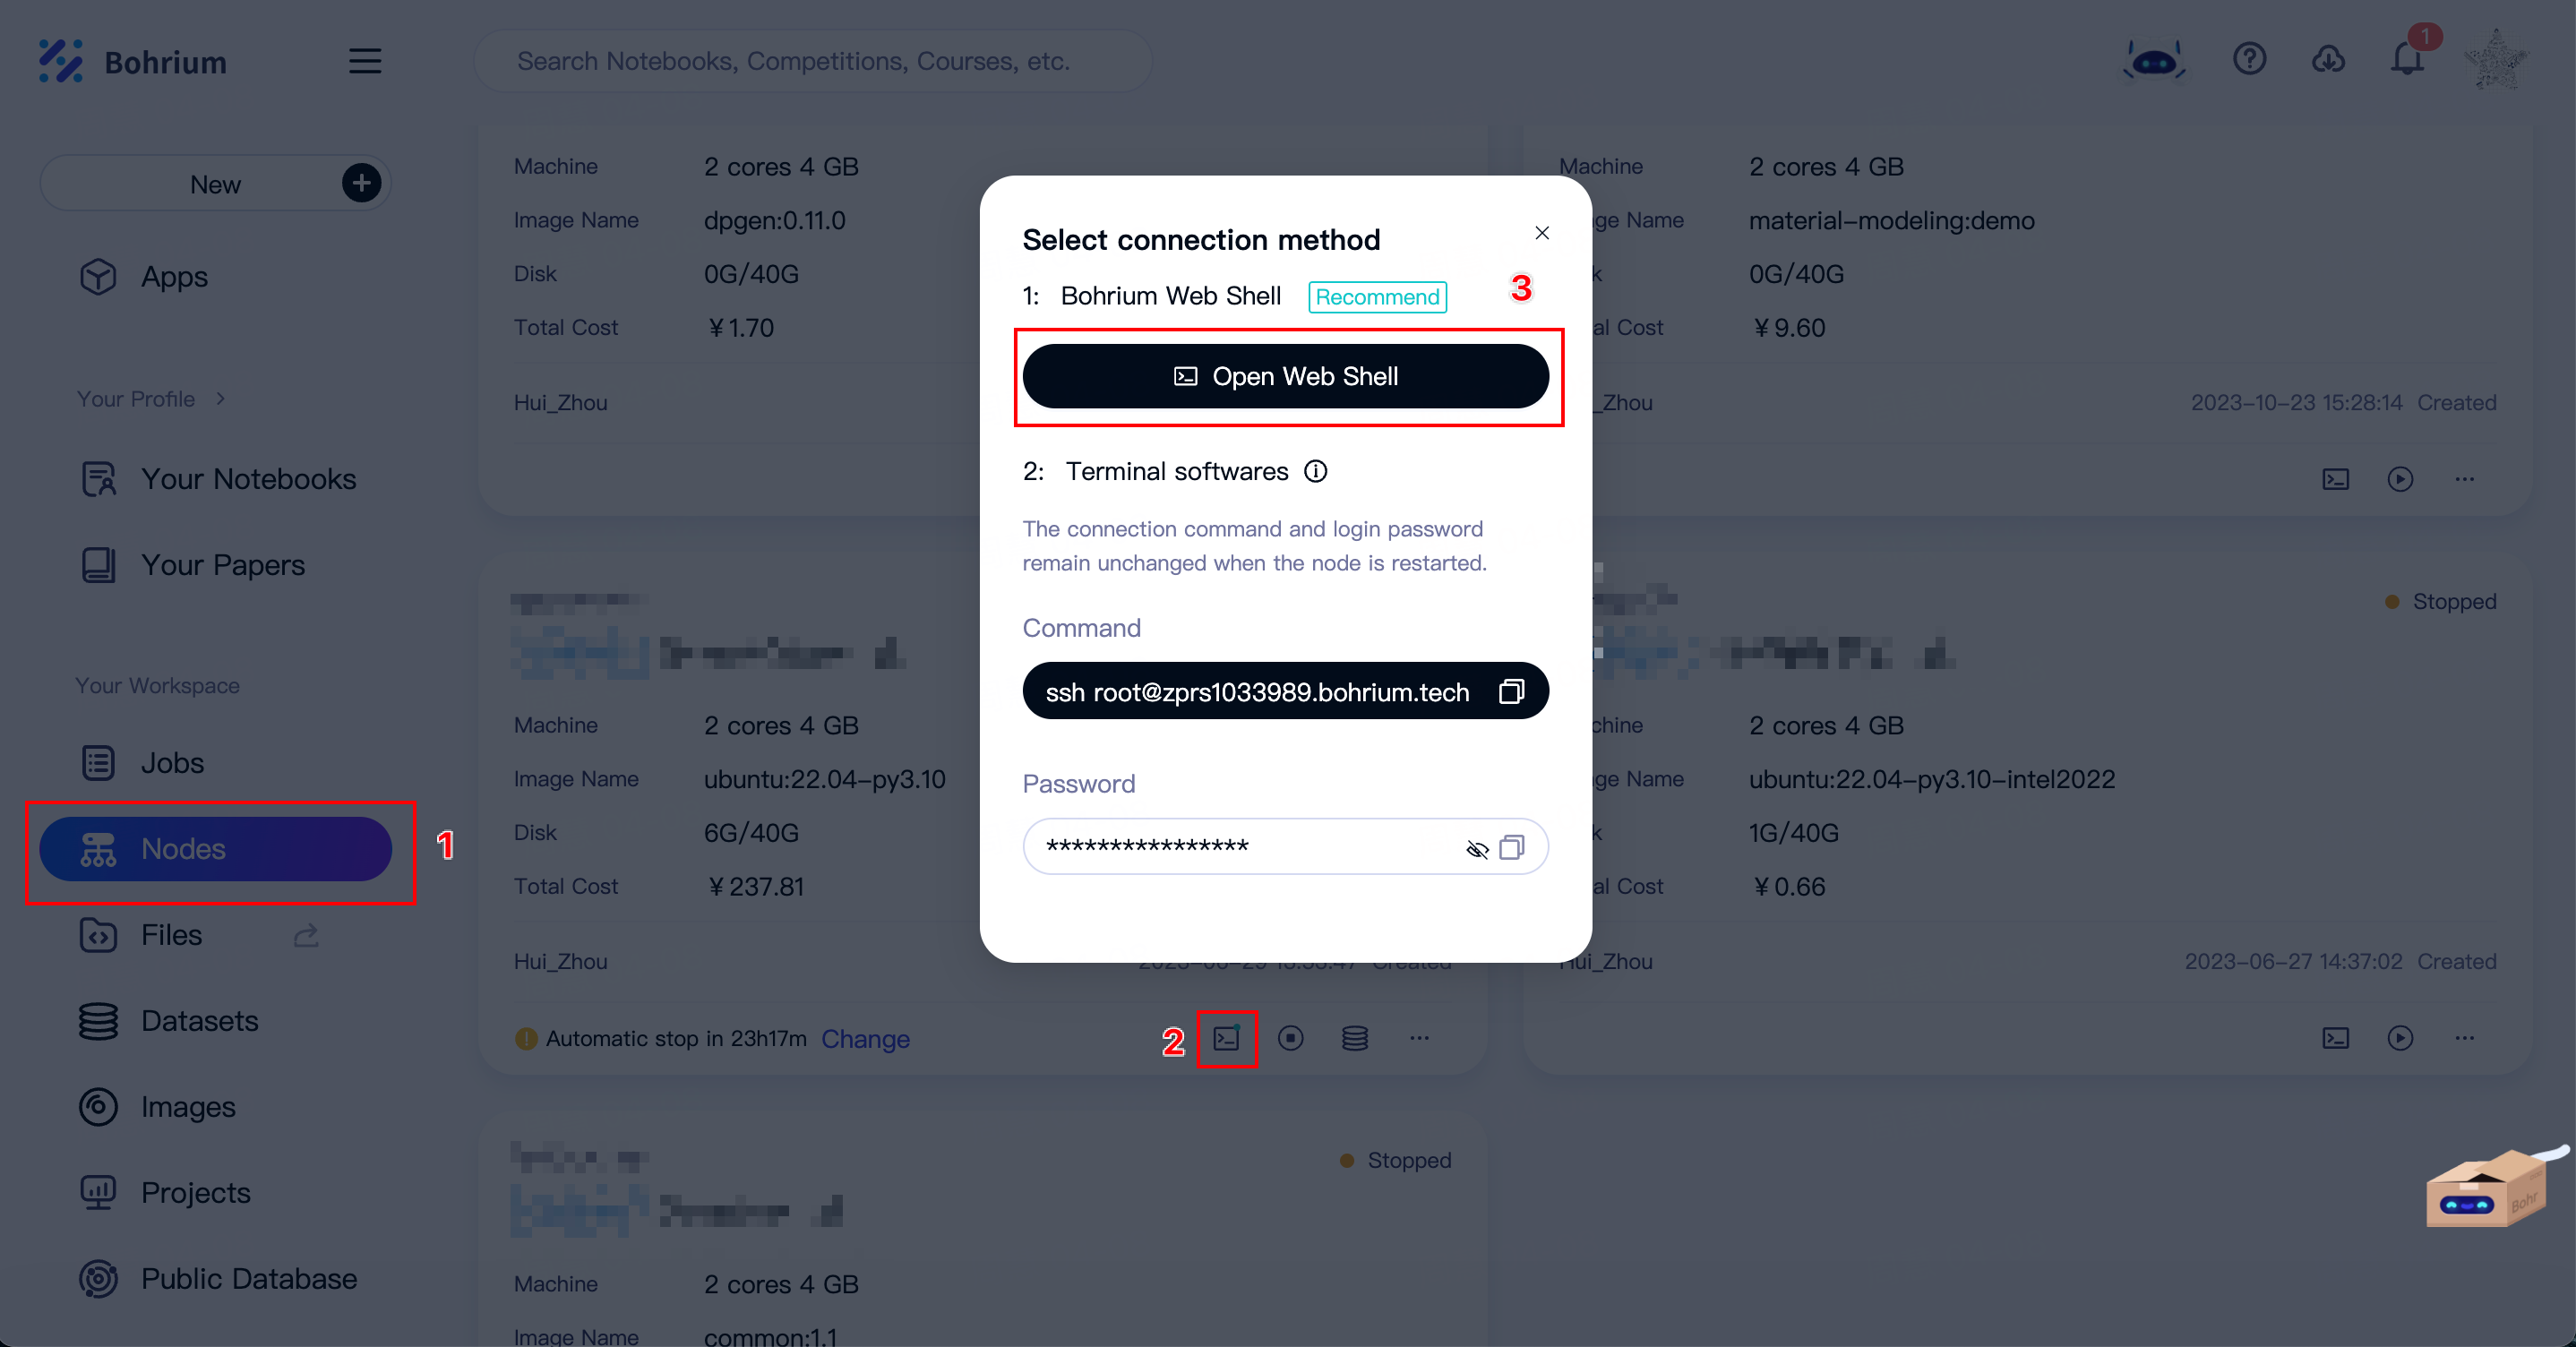
Bohrium provides a web-based SSH tool called Web Shell and also supports logging into the management node through your local terminal. In this tutorial, we will demonstrate using the Web Shell. Click the button indicated by the red box 2 in the image and select Web Shell:
If you choose to submit the job on your local machine, you can skip this step and proceed with the following operations.
4. Run DeePMD-kit job
In this tutorial, we will demonstrate using DeePMD-kit to train a deep potential model of water. The job will take approximately 10 minutes to run.
1. Prepare the input files
Open the Bohrium Workspace page and use the cd /personal command to enter the personal data disk. You can transfer data to the data disk by dragging and uploading files.
In this tutorial, we will use wget to download the DeePMD-kit input files. The input files are stored in the Bohrium_DeePMD-kit_example folder. You can execute the following two commands to download and unzip them:
wget https://bohrium-example.oss-cn-zhangjiakou.aliyuncs.com/Bohrium_DeePMD-kit_example.zip
unzip Bohrium_DeePMD-kit_example.zip
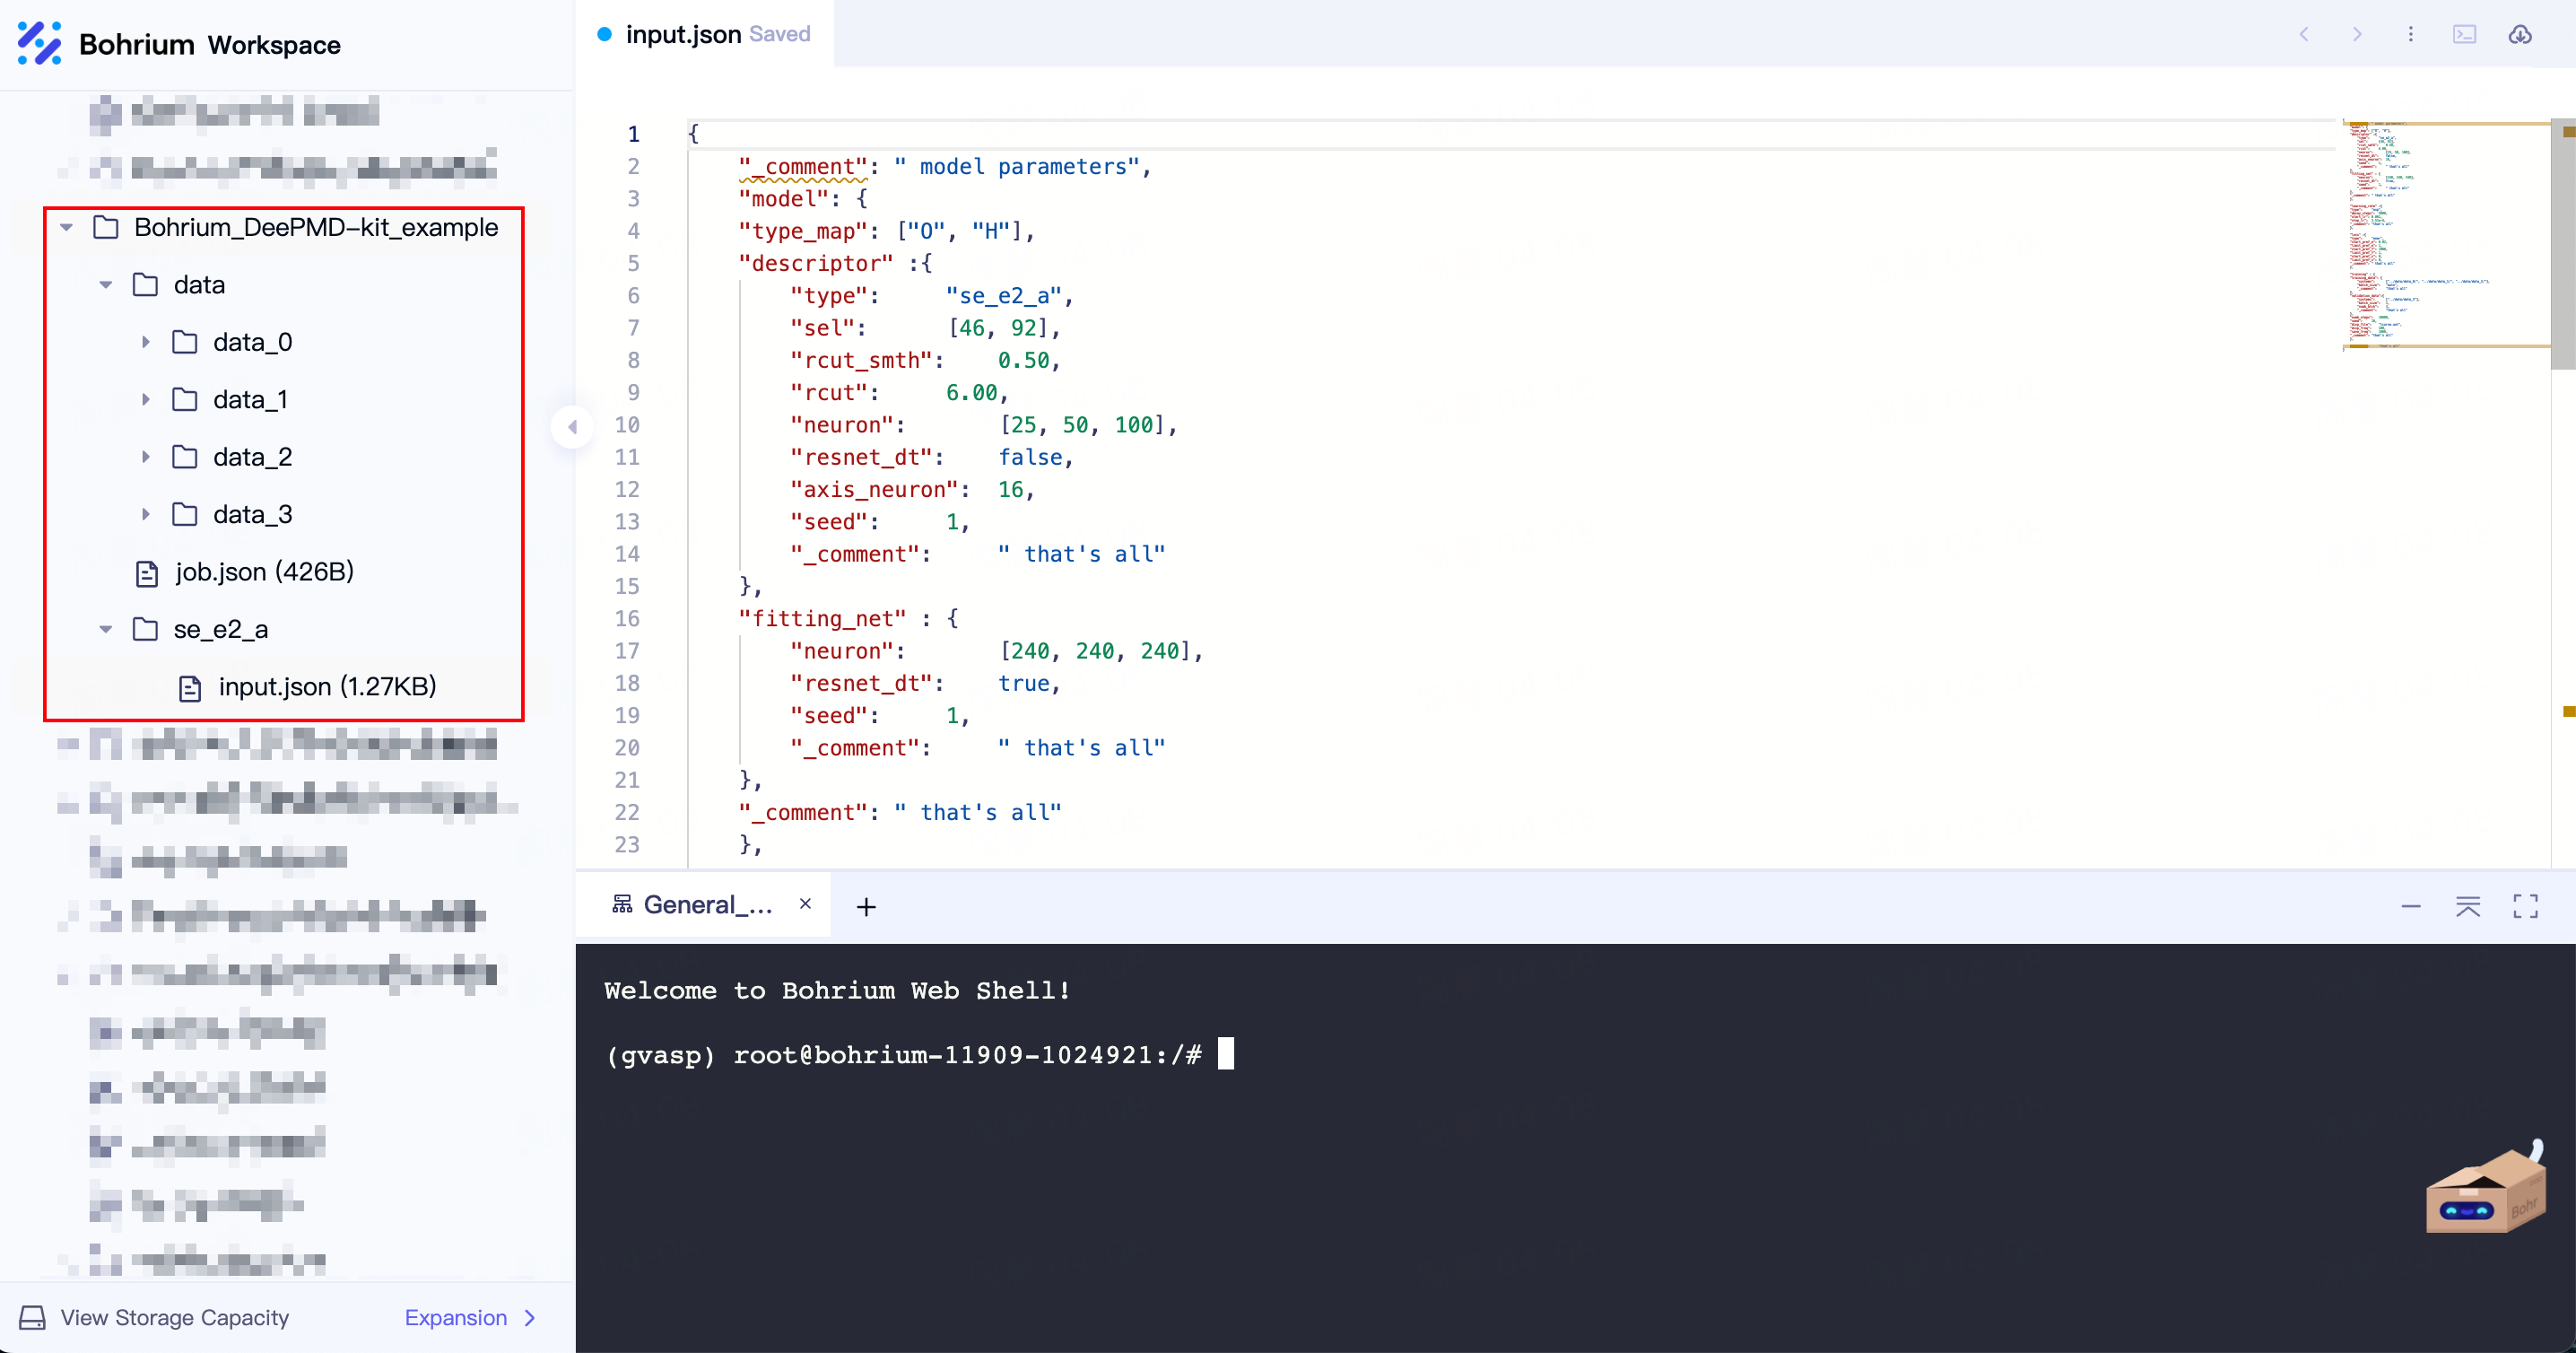
Refresh and expand the directory tree on the left side, as shown in the following image, which indicates that the data has been successfully prepared.
2. Configure Bohrium CLI
We will use bohr to submit jobs. If you are using the Bohrium management node to submit jobs, the selected image ubuntu:20.04-py3.10 already has Bohrium CLI pre-installed. If you are using your local machine to submit jobs, you can install it with the following command:
linux Version
Use curl to download:
/bin/bash -c "$(curl -fsSL https://dp-public.oss-cn-beijing.aliyuncs.com/bohrctl/1.0.0/install_bohr_linux_curl.sh)"
macOS Version
Use curl to download:
/bin/bash -c "$(curl -fsSL https://dp-public.oss-cn-beijing.aliyuncs.com/bohrctl/1.0.0/install_bohr_mac_curl.sh)"
Windows Version
Use curl to download:
curl -o install_bohr_windows_wget.bat https://dp-public.oss-cn-beijing.aliyuncs.com/bohrctl/1.0.0/install_bohr_windows_curl.bat && install_bohr_windows_wget.bat
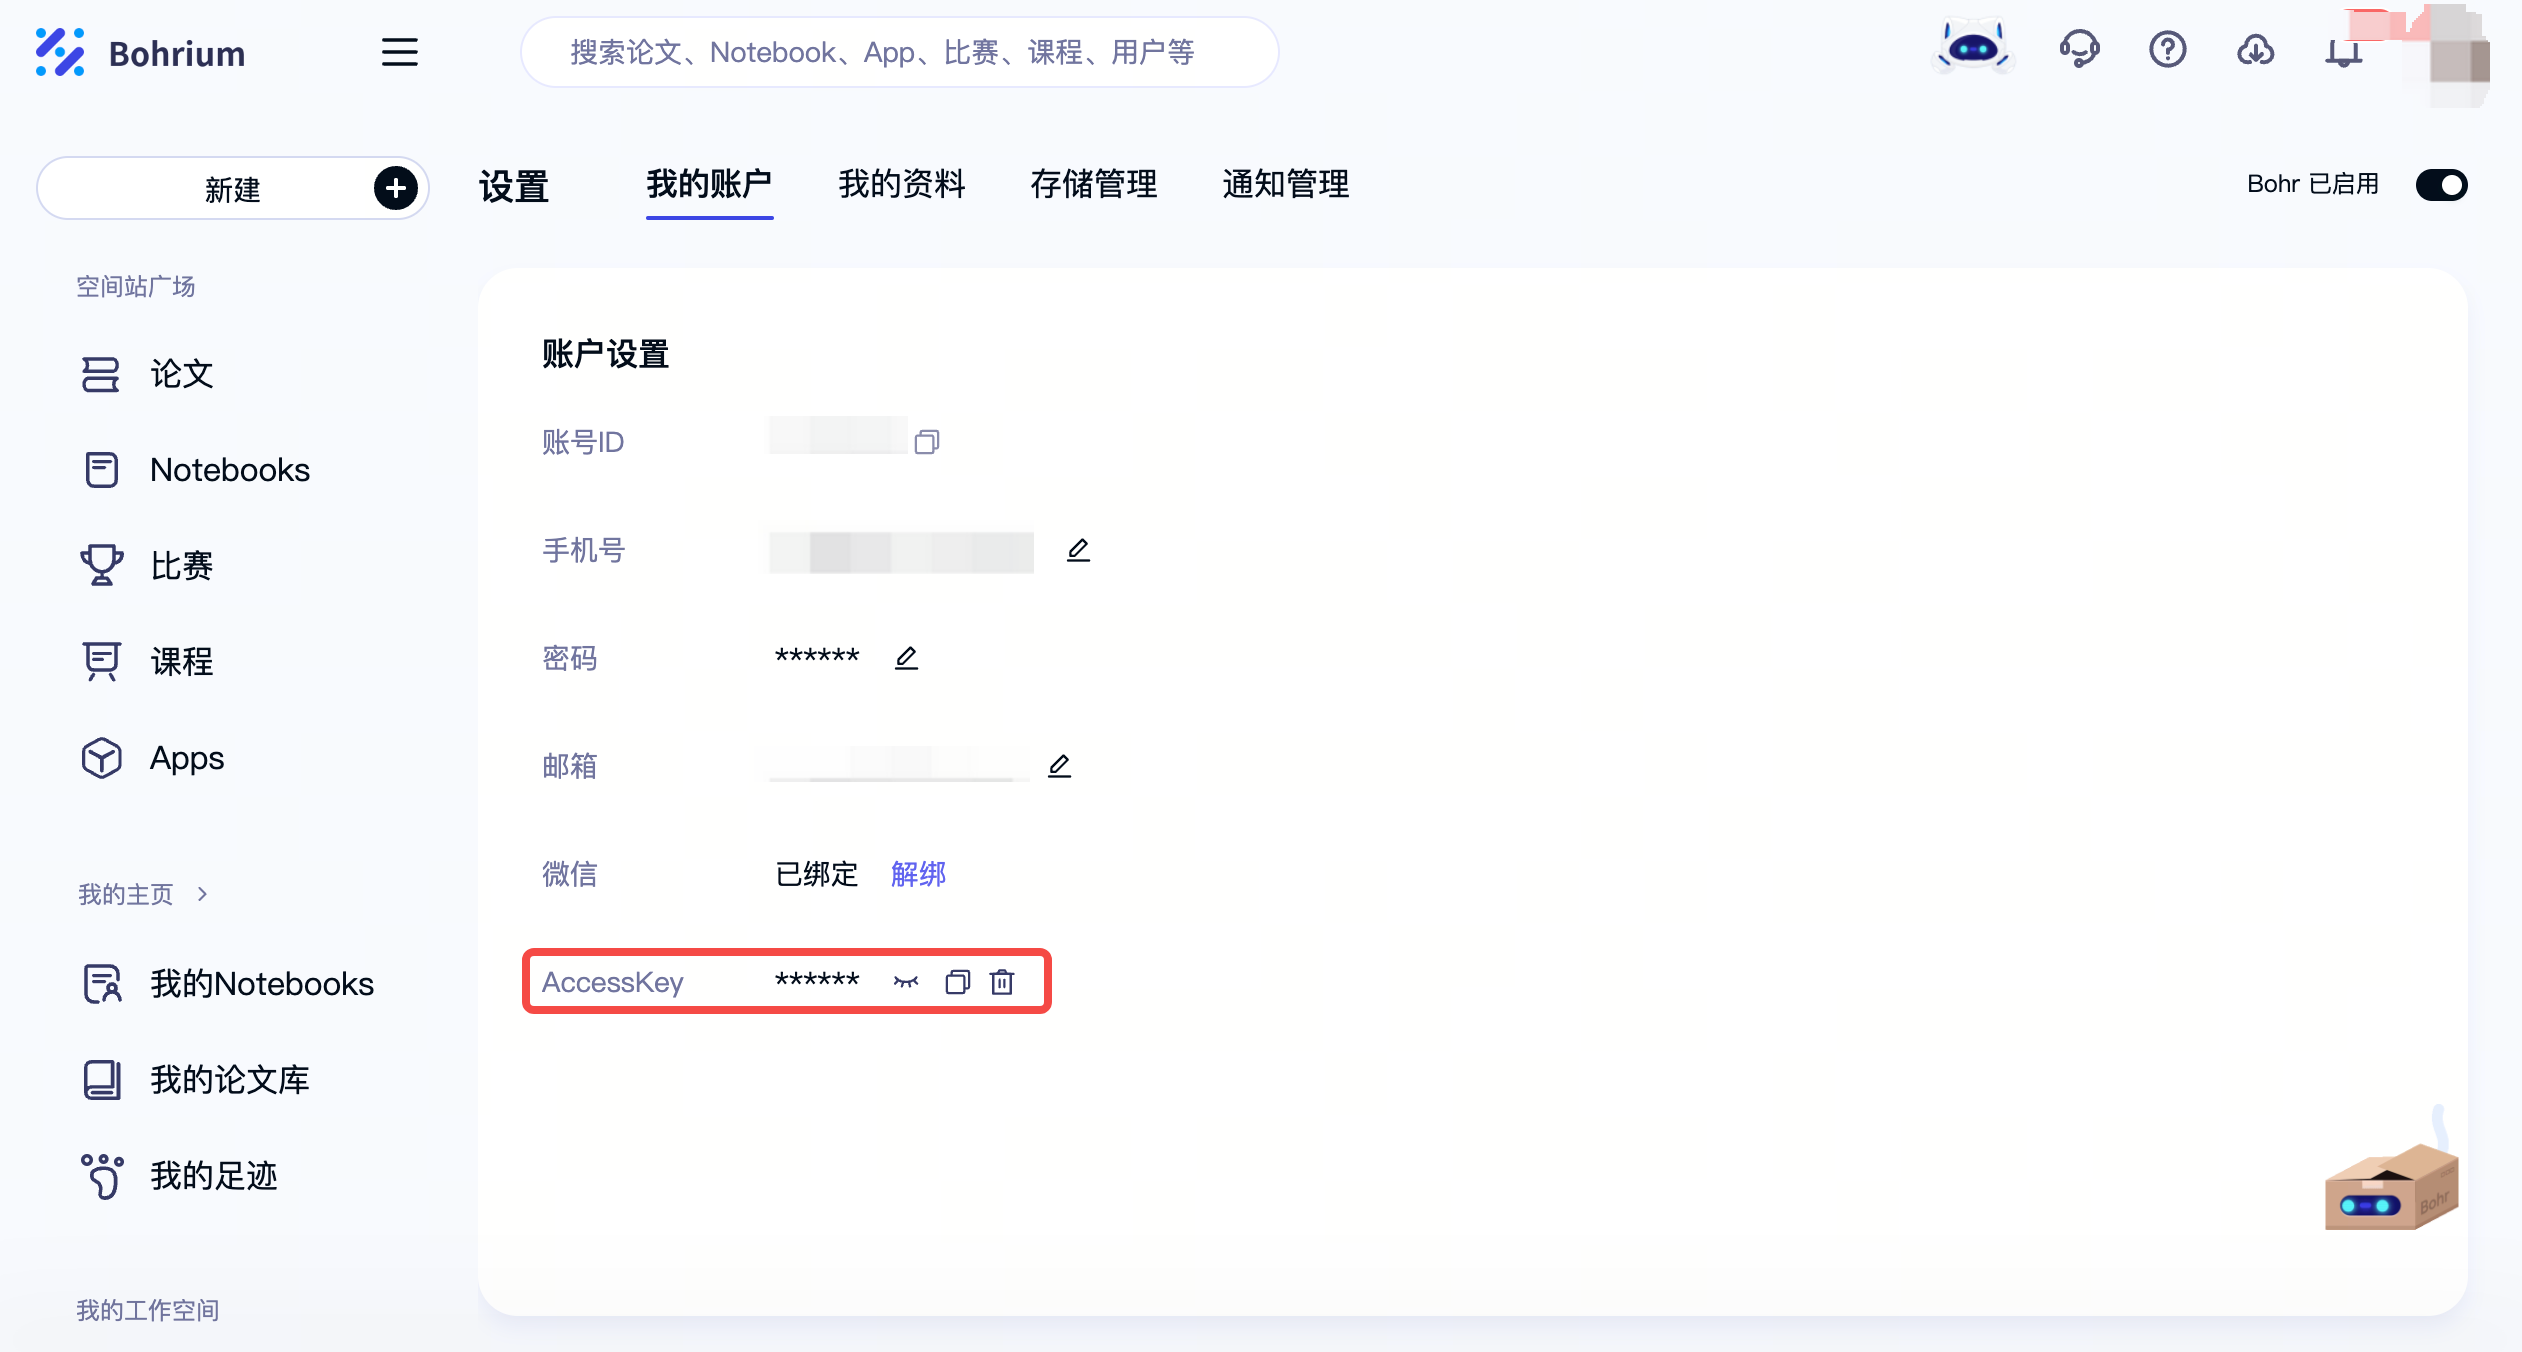
When using the Bohrium CLI for the first time, you need to bind an AccessKey. Please ensure that the bound AccessKey is correct.
Please visit Bohrium-AccessKey to generate an AccessKey (Recreating the AccessKey will cause the original one to become invalid.)
After obtaining the ACCESS_KEY value, configure the environment variables for ACCESS_KEY as follows:
Note: Please replace the
XXXXafterACCESS_KEYwith your own AccessKey.
ZSH
If you are using ZSH, use the following command to write the ACCESS_KEY into ~/.zshrc.
echo 'export ACCESS_KEY=XXXX' >> ~/.zshrc
source ~/.zshrc
BASH
If you are using ZSH, use the following command to write the ACCESS_KEY into ~/.bashrc.
echo 'export ACCESS_KEY=XXXX' >> ~/.bashrc
source ~/.bashrc
Windows
Open Command Prompt (CMD) and run the following commands (note that the setx command requires reopening the Command Prompt to take effect):
setx ACCESS_KEY XXXX
Alternatively, you can manually add these variables through the system settings.
3. Prepare the configuration file
The configuration file job.json has already been preloaded in the input folder, we only need to modify some of the parameters in it. Run the following command to enter the input folder:
cd Bohrium_DeePMD-kit_example
In the Web Shell, you can double-click the job.json file in the left-side file tree to edit and save it online, or you can edit it in the command-line window:
vi job.json
Enter i to enter edit mode, after completing the modifications, press esc to exit edit mode and then enter : to enter the command mode. Next, enter wq to save and exit. The content of the configuration file is as follows:
Notice:All 0000 after "project_id" need to be replaced with your own project ID, which can be viewed on the "Projects" page. Also, the JSON file format requires that no commas be added after the last field within the {}, otherwise, there will be a syntax error.
{
  "job_name": "DeePMD-kit test",
  "command": " cd se_e2_a && dp train input.json > tmp_log 2>&1 && dp freeze -o graph.pb",
  "log_file": "se_e2_a/tmp_log",
  "backward_files": ["se_e2_a/lcurve.out", "se_e2_a/graph.pb"],
  "project_id": 0000,
  "platform": "ali",
  "machine_type": "c4_m15_1 * NVIDIA T4",
  "job_type": "container",
  "image_address": "registry.dp.tech/dptech/deepmd-kit:2.1.5-cuda11.6"
}
job.json field description
| Field Name | Description | Example |
|---|---|---|
| job_name | The name of your computing job, which can be named freely. | DeePMD-kit test |
| command | The command to be executed on the computing node. Enter the folder where the script for this tutorial is located, execute the dp train command, and print the screen output to the tmp_log file, execute the dp freeze command, and save the result to the graph.pb file. | cd se_e2_a && dp train input.json > tmp_log 2>&1 && dp freeze -o graph.pb |
| log_file | The log file that can be viewed at any time during the calculation process, which can be viewed on the Bohrium "Jobs" page. | se_e2_a/tmp_log |
| backward_files | The result files that need to be downloaded after the calculation is finished. If the field is empty, all files in the working directory of the computing node will be retained. | se_e2_a/lcurve.out,se_e2_a/graph.pb |
| project_id | The project ID to which the job belongs. It can be viewed on the "Projects" page. | 0000 |
| machine_type | The machine type used for this job, which can be viewed on the "Pricing" page. In this tutorial, we use a 4 core 15G memory NVIDIA T4 GPU machine to accelerate the training process of DeePMD-kit. If you need faster speed, you can choose the A100 or V100 machine. | c4_m15_1 * NVIDIA T4 |
| image_address | The image address for the computing node, which can be viewed on the "Images" page. The software used in this tutorial is DeePMD-kit version 2.1.5. | registry.dp.tech/dptech/deepmd-kit:2.1.5-cuda11.6 |
At this point, we have completed the preparation of all the necessary documents for the case.
4. Submit job
Using Bohrium CLI to submit the job:
bohr job submit -i job.json -p ./
Where:
-ispecifies the configuration file for the job, which isjob.jsonin this tutorial.-pspecifies the directory where the input files are located. Bohrium will package and upload the specified directory, and after decompressing it on the computing node, it will switch the working directory to that directory. In this tutorial, it is./.
As shown below, the job is submitted successfully:

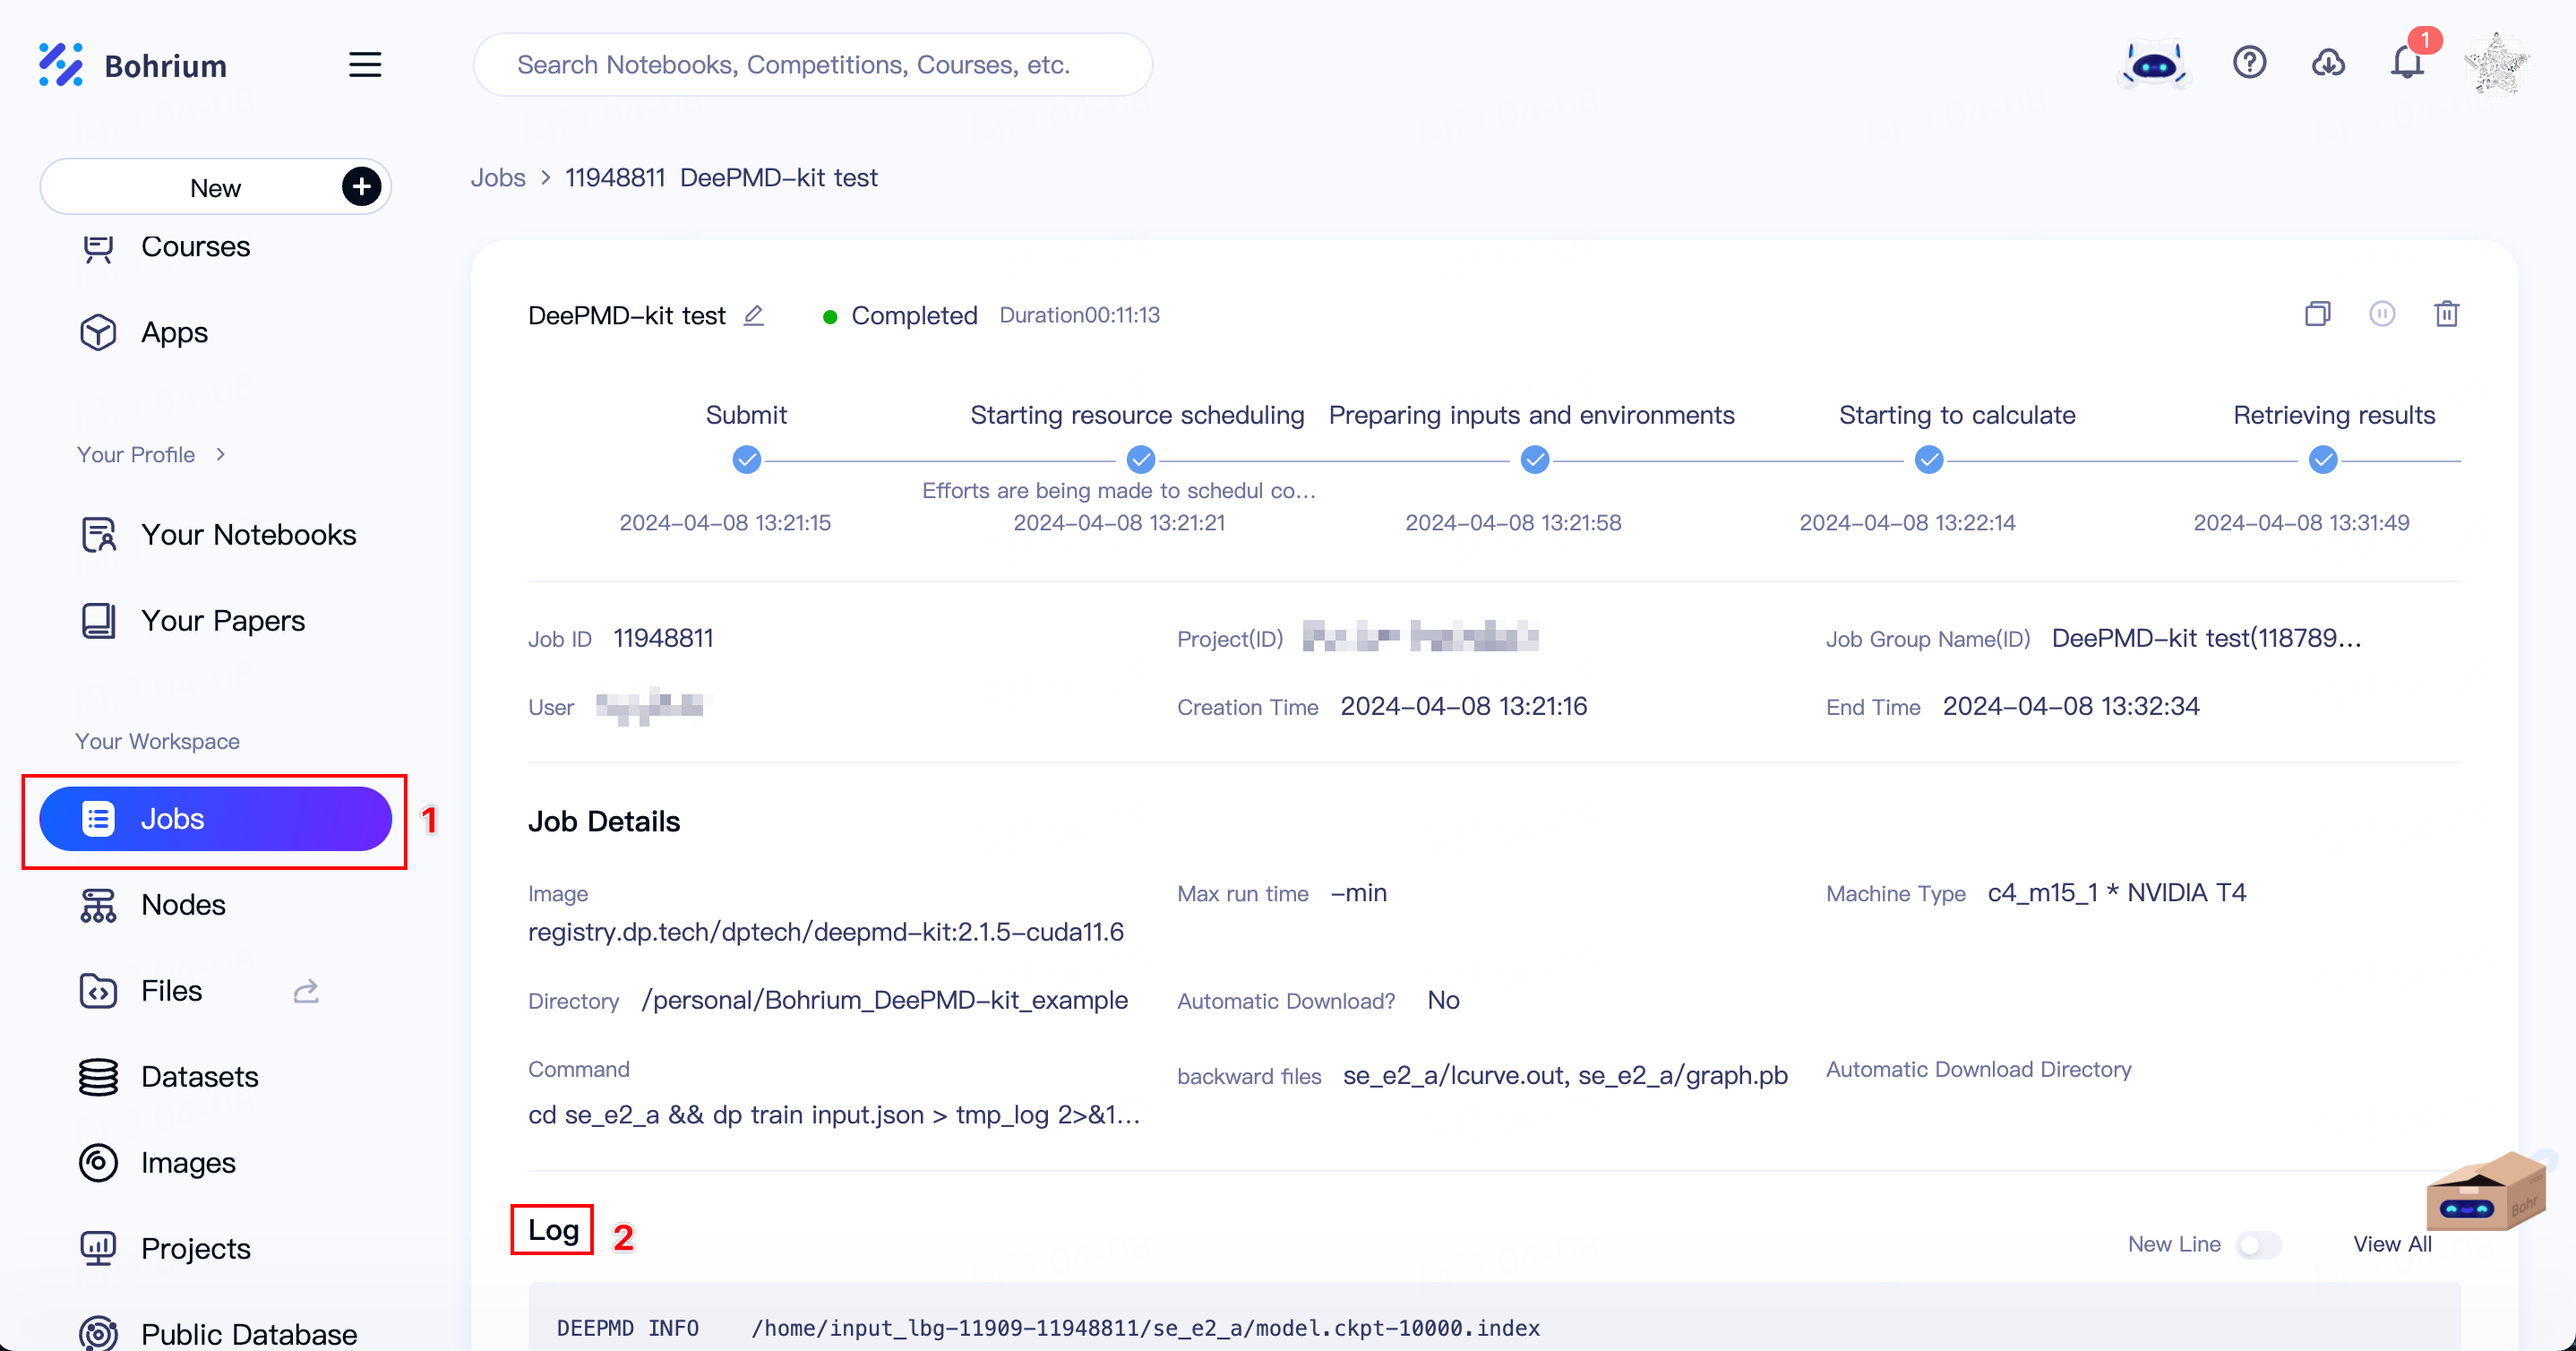
5. Check job status
After successfully submitting the job, you can view the progress and related logs of the submitted jobs on the "Jobs" page.
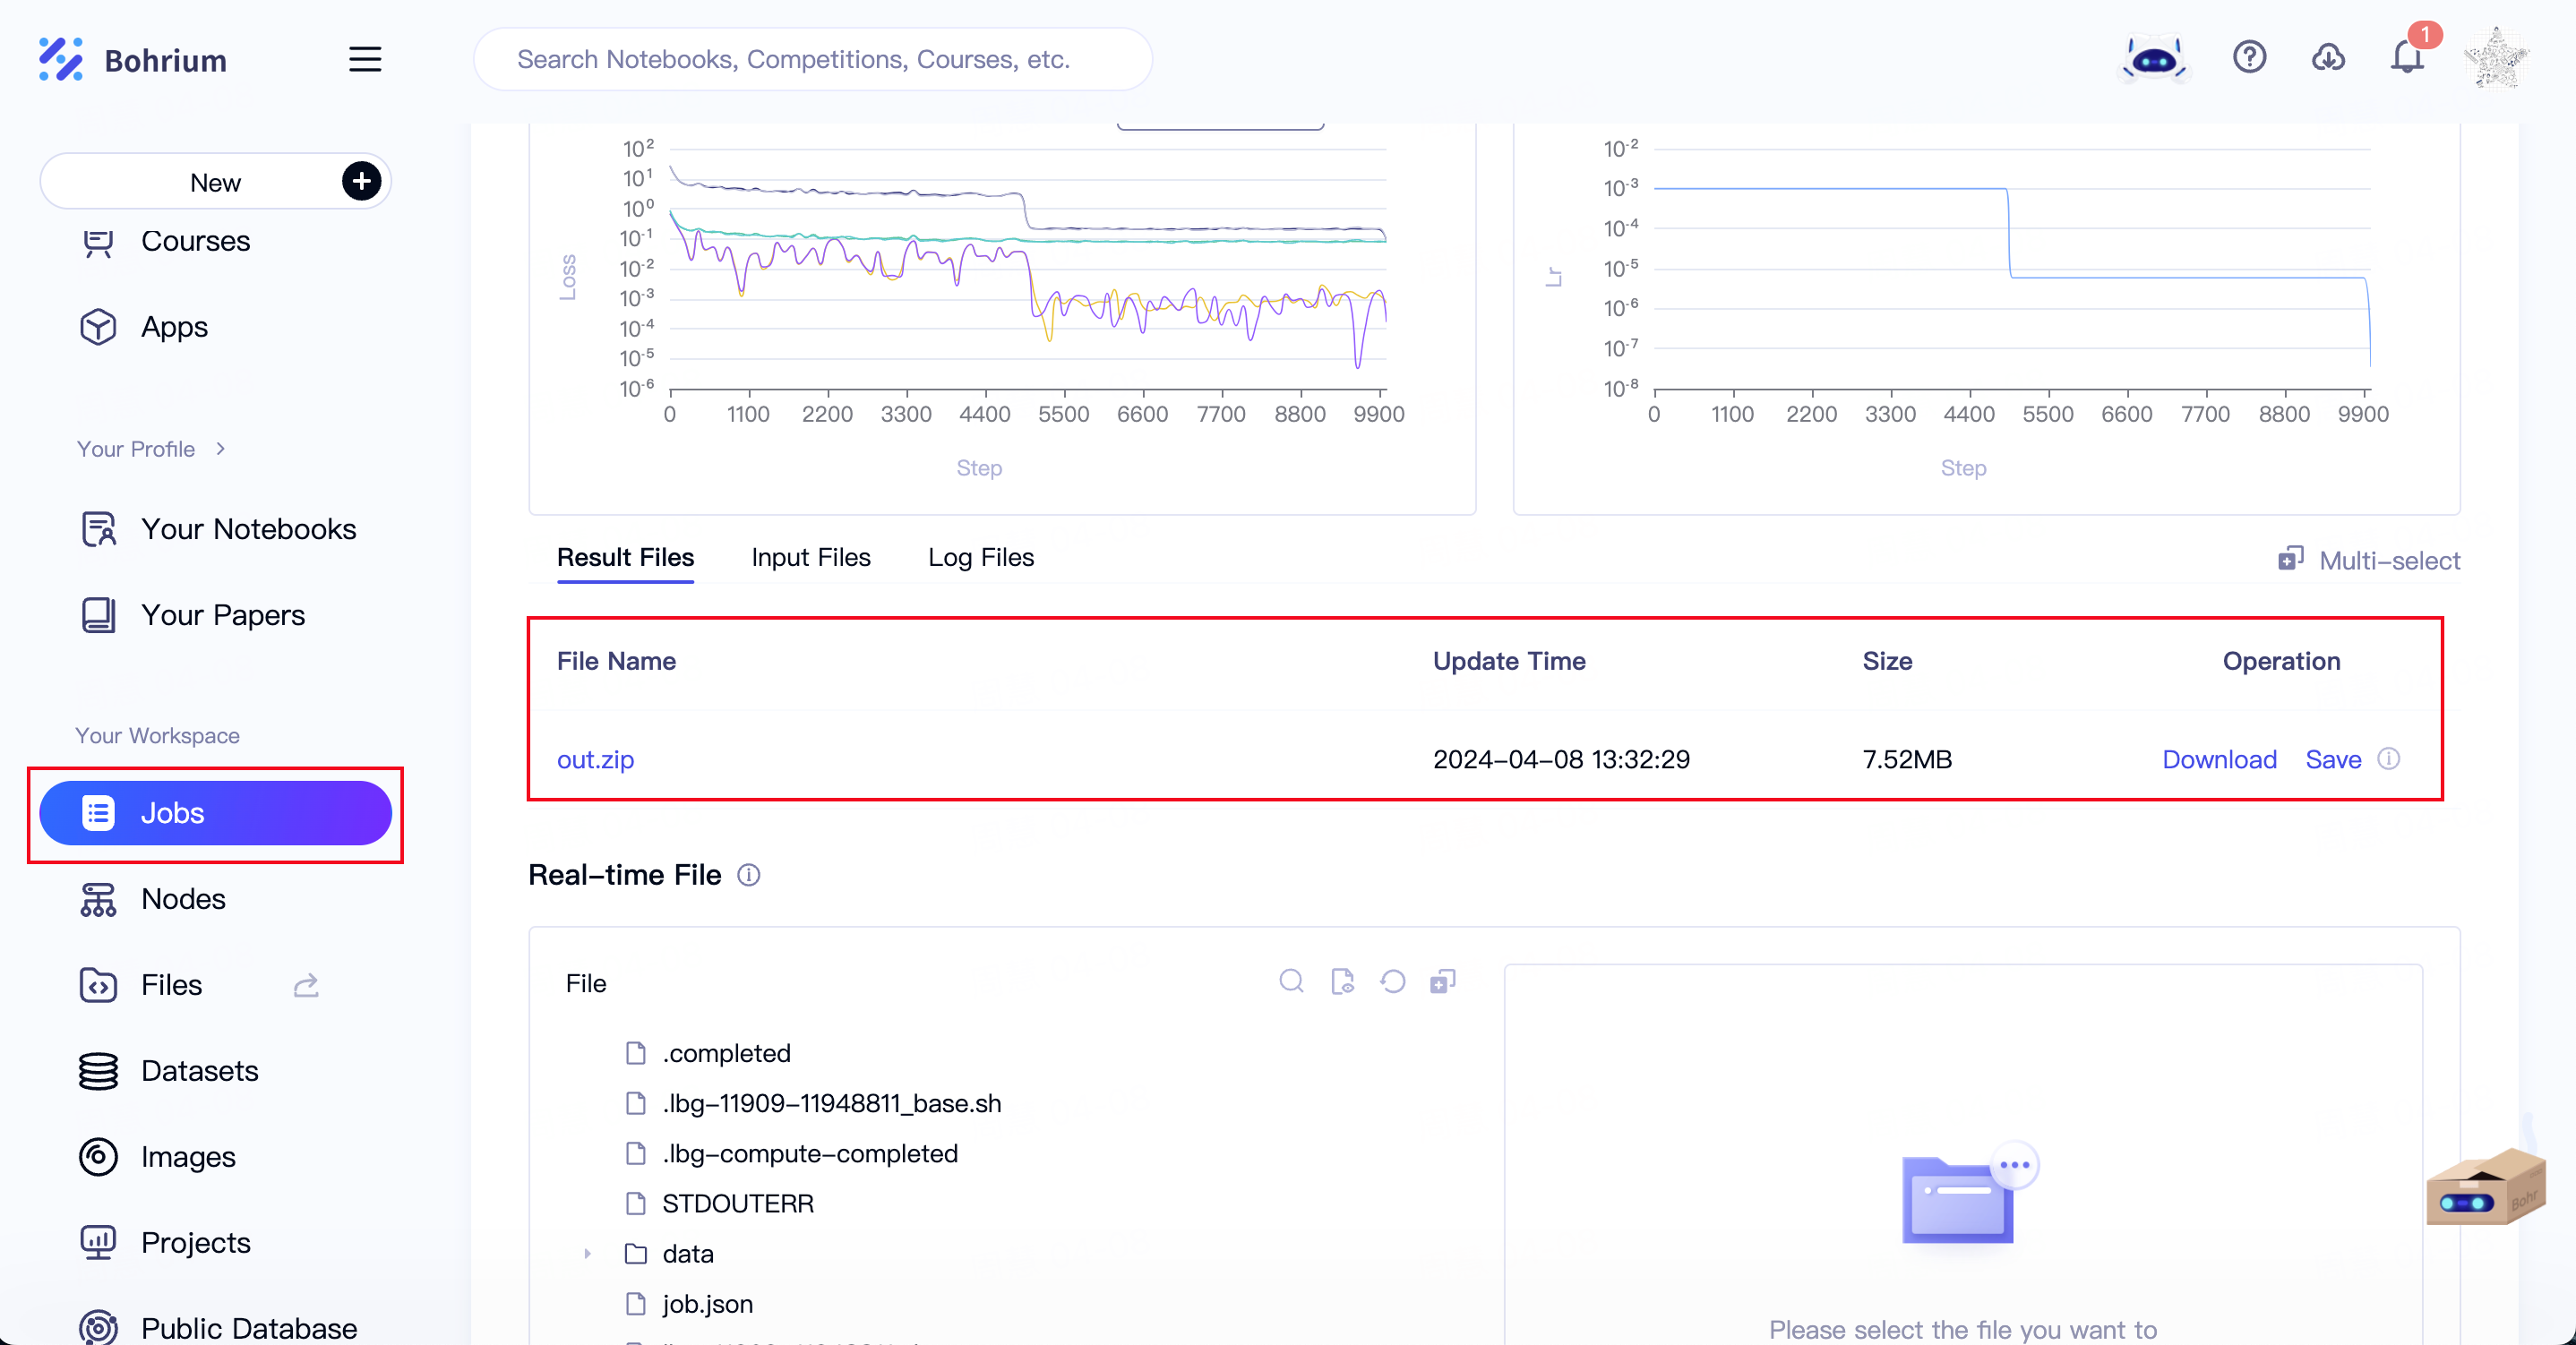
6. Download Results
After the job calculation is completed, you can download the results on the "Jobs" page, or save them to the data disk.
You can also download it using the commands of Bohrium CLI
bohr job download -j <JOB ID>
or
bohr job_group download -j <JOB GROUP ID>
So far, we have completed the running of a DeePMD-kit training job on Bohrium.
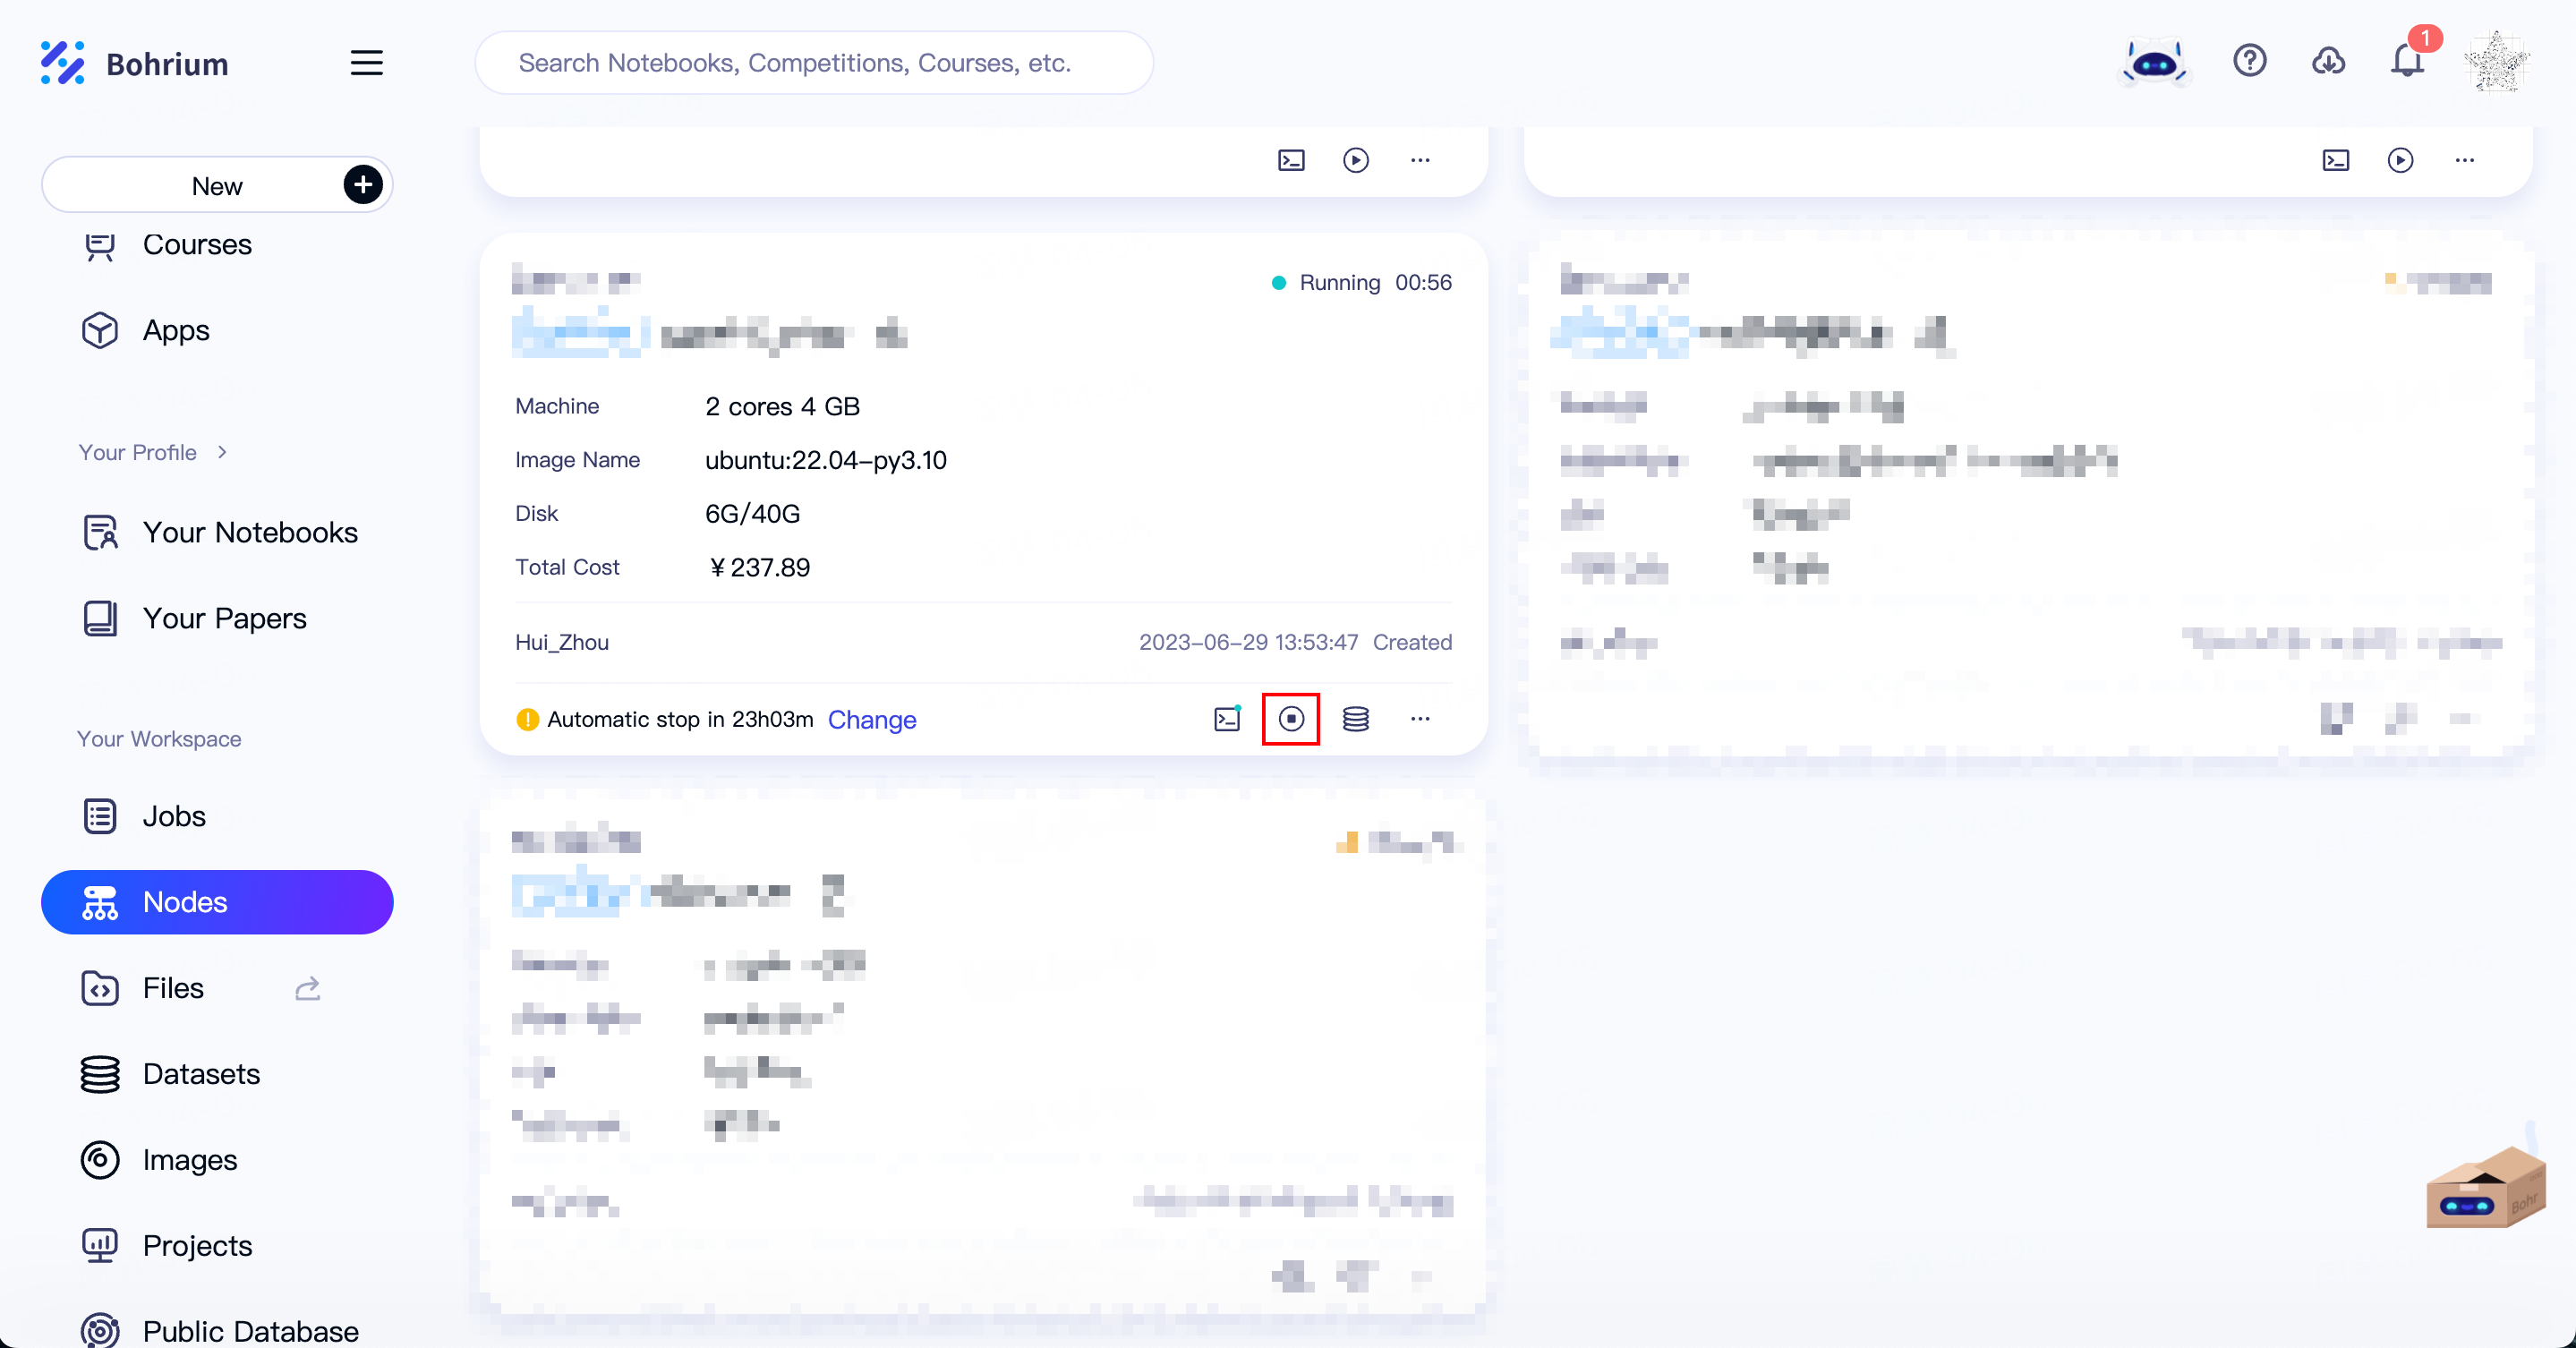
Finally, don't forget to stop or delete the node after finishing your work on the "Nodes" page to avoid wasting resources.